
At the moment (URP 12.1.5, May 2022) there is no easy way to have custom Post Processing effects in Unity’s URP working with Volumes.
The URP Roadmap says that it’s “in progress”, but even if this has been the case for a while now, we do have some features that can help us manually achieve the same result anyways (similar to the previous Post Processing Stack V2).
You will be able to you place Volumes in the scene and have their attached post processing effects get applied gradually based on the camera position, like this:
Since we’ll be using actual Volumes, I hope that once Unity rolls out their official (or better / documented) solution, it will be really easy for us to convert from this custom solution to their new one - and I hope that it happens soon. Until then… let’s start!
PS. Oh hey almost three years ago I released a plugin called “Text Animator for Unity”, a tool I made/needed for my own games - and Today it is also getting used in other games like “Dredge, Cult of The Lamb”, “Slime Rancher 2” and many more!! I’d love if you could check it out! you’d also support me while I work on exciting stuff behind the scenes, so… thank you very much! ✨
Baaack to the article.
Unity’s Way
Unity has some built-in post processing effects in URP, like Bloom, Vignette and similar.
The good thing about packages from the Package Manager is that they’re all open source, meaning that we can open their files and discover how they’re doing things - which is exactly what I did and what you’ll see here.
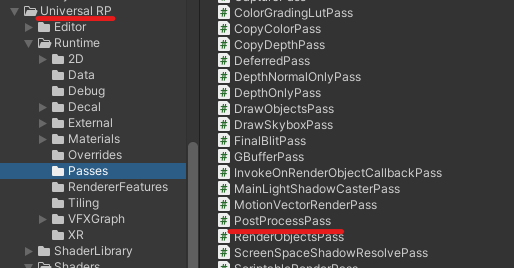
By opening the “PostProcessPass”, located in Packages -> Universal RP -> Runtime -> Passes…
…we can see that Unity is performing a few steps:
- Have a “VolumeComponent” class for every post processing effect
- Create the necessary materials for each post processing effect (e.g. blur material)
- Render the components that are present in the Volume Manager stack
- ???
- Profit
We will do this too (kind of) - and jokes aside - things are not documented yet AND shaders are obscure anyways, so I’ll explain stuff as easily as I have understood them. Be prepared.
How it works
The custom system needs:
- A volume component for every custom post processing effect we want, which will simply hold variables data (like “intensity”).
- A custom renderer feature, which will be added to camera’s URP renderer and render our pass.
- A custom pass, which will actually execute every post processing component and “paste them” to camera (“blit”).
Unity also “creates the necessary materials” inside their pass, but they also invoke a method that destroys them (otherwise we would have our memory fill up quickly) and I couldn’t find where/how it’s invoked. I also needed these materials elsewhere in my game, so instead of having duplicates I simply opted for having:
- A class that “gives us effects’ materials”, which might be a Scriptable Object loaded from Resources, Addressables or similar. It’s up to you! (and I have added an example at the end of the post just in case.)
P.S. This post assumes that your project is already set up with URP and that it is enabled to render its default post processing. If it’s not, read more in the documentation.
This post was written for Unity 2021.X, so in case there’s a different way to perform custom passes/features in higher version(s), you can always check what they changed from their package folder.
Creating a Custom Effect
As an example, we’ll create a super simple post processing effect that will fade the screen color based on the volume intensity.
Volume Components
Volumes let you fade effects parameters gradually based on their weights (“interpolating” from 0 = no effect, to 1 = full effect). They can be applied globally or locally (where weight is also affected by the camera’s distance from the volume bounds).
You can read more about interpolations, in my blog post about Easing Functions.
Add a script named “CustomEffectComponent” and write:
using System;
using UnityEngine;
using UnityEngine.Rendering;
using UnityEngine.Rendering.Universal;

[Serializable, VolumeComponentMenuForRenderPipeline("Custom/CustomEffectComponent", typeof(UniversalRenderPipeline))]
public class CustomEffectComponent : VolumeComponent, IPostProcessComponent
{
	// For example, an intensity parameter that goes from 0 to 1
    public ClampedFloatParameter intensity = new ClampedFloatParameter(value: 0, min: 0, max: 1, overrideState: true);
    // A color that is constant even when the weight changes
    public NoInterpColorParameter overlayColor = new NoInterpColorParameter(Color.cyan);

    // Other 'Parameter' variables you might have

    // Tells when our effect should be rendered
    public bool IsActive() => intensity.value > 0;

   	// I have no idea what this does yet but I'll update the post once I find an usage
    public bool IsTileCompatible() => true;
}
At this point we can already create a new volume in the scene and add this exact volume component to it.
Now, let’s talk about the most obscure stuff:
Volume Parameters and Interpolations
Volume Components are really cool because they do everything. The parameters we write inside them are automatically interpolated by Unity’s Volume class based on camera distance etc., meaning that we can sit back and relax… except for the things that are not documented anywhere (but that’s why this post).
First, there are different types of parameters. We cannot use standard “float” or “string” types, but we must use the ones that end in “Parameter”, like “FloatParameter”, “IntParameter” and more, in order to let Volumes do the magic with them. (More precisely, the ones that inherit from “VolumeParameter”.)
Until there’s an actual documentation… just start writing “parameter” inside Visual Studio and it will tell you what else exists.
Different parameters are interpolated differently, and some are not interpolated at all. You can discover this by their prefix, for example “ClampedFloatParameter” (which we used above) interpolates from a minimum value to a maximum. It acts like if you have “[Range(min,max)]” before a float. Don’t change it with a “RangedFloatParameter” though, which is actually a Vector2. (??)
You will want to use “Interpolated” parameters (like “ClampedFloatParameter”) for stuff that will change based on the weight/distance of the volume, for example an intensity.
You will want to use “Non Interpolated” parameters (like “NoInterpColorParameter”) for things that do not have to change based on the volume weight, for example an “overlay color” (which might be interpolated with the intensity already, so doing it further will create a mess).
If you see weird results when the volume weight changes, it’s probably because you’re using the wrong interpolated parameters.
You can also create your own custom Parameters and override the “Interp” method as you prefer, creating different easing functions and more. (Again, here is my article about Easing Functions in case you need it.)
Declaration
Please, please, please! When you declare an “Interpolated” parameter (like “ClampedFloatParameter”) be sure to use its “zero weight”/”lerp start” value as default! For example, if you want a float that goes from 2 to 4, then write new ClampedFloatParameter(value: 2, min: 2, max: 4);. This is the value that the Volume will use when lerping from zero weight to full weight, otherwise if you use an higher value (like: value:3, min:2, max:4) it will actually stop at 3 and never reach the minimum, going from 3 to 4.
Enough with the Volumes magic, it’s time to render our effect!
Post Processing Overlay Shader
First, we need the actual shader that will process our image.
If you are familiar with shaders already, you might be happy to know that its format is the same as the ones we have always used (instead of the Post Processing Stack V2 that changed stuff a bit).
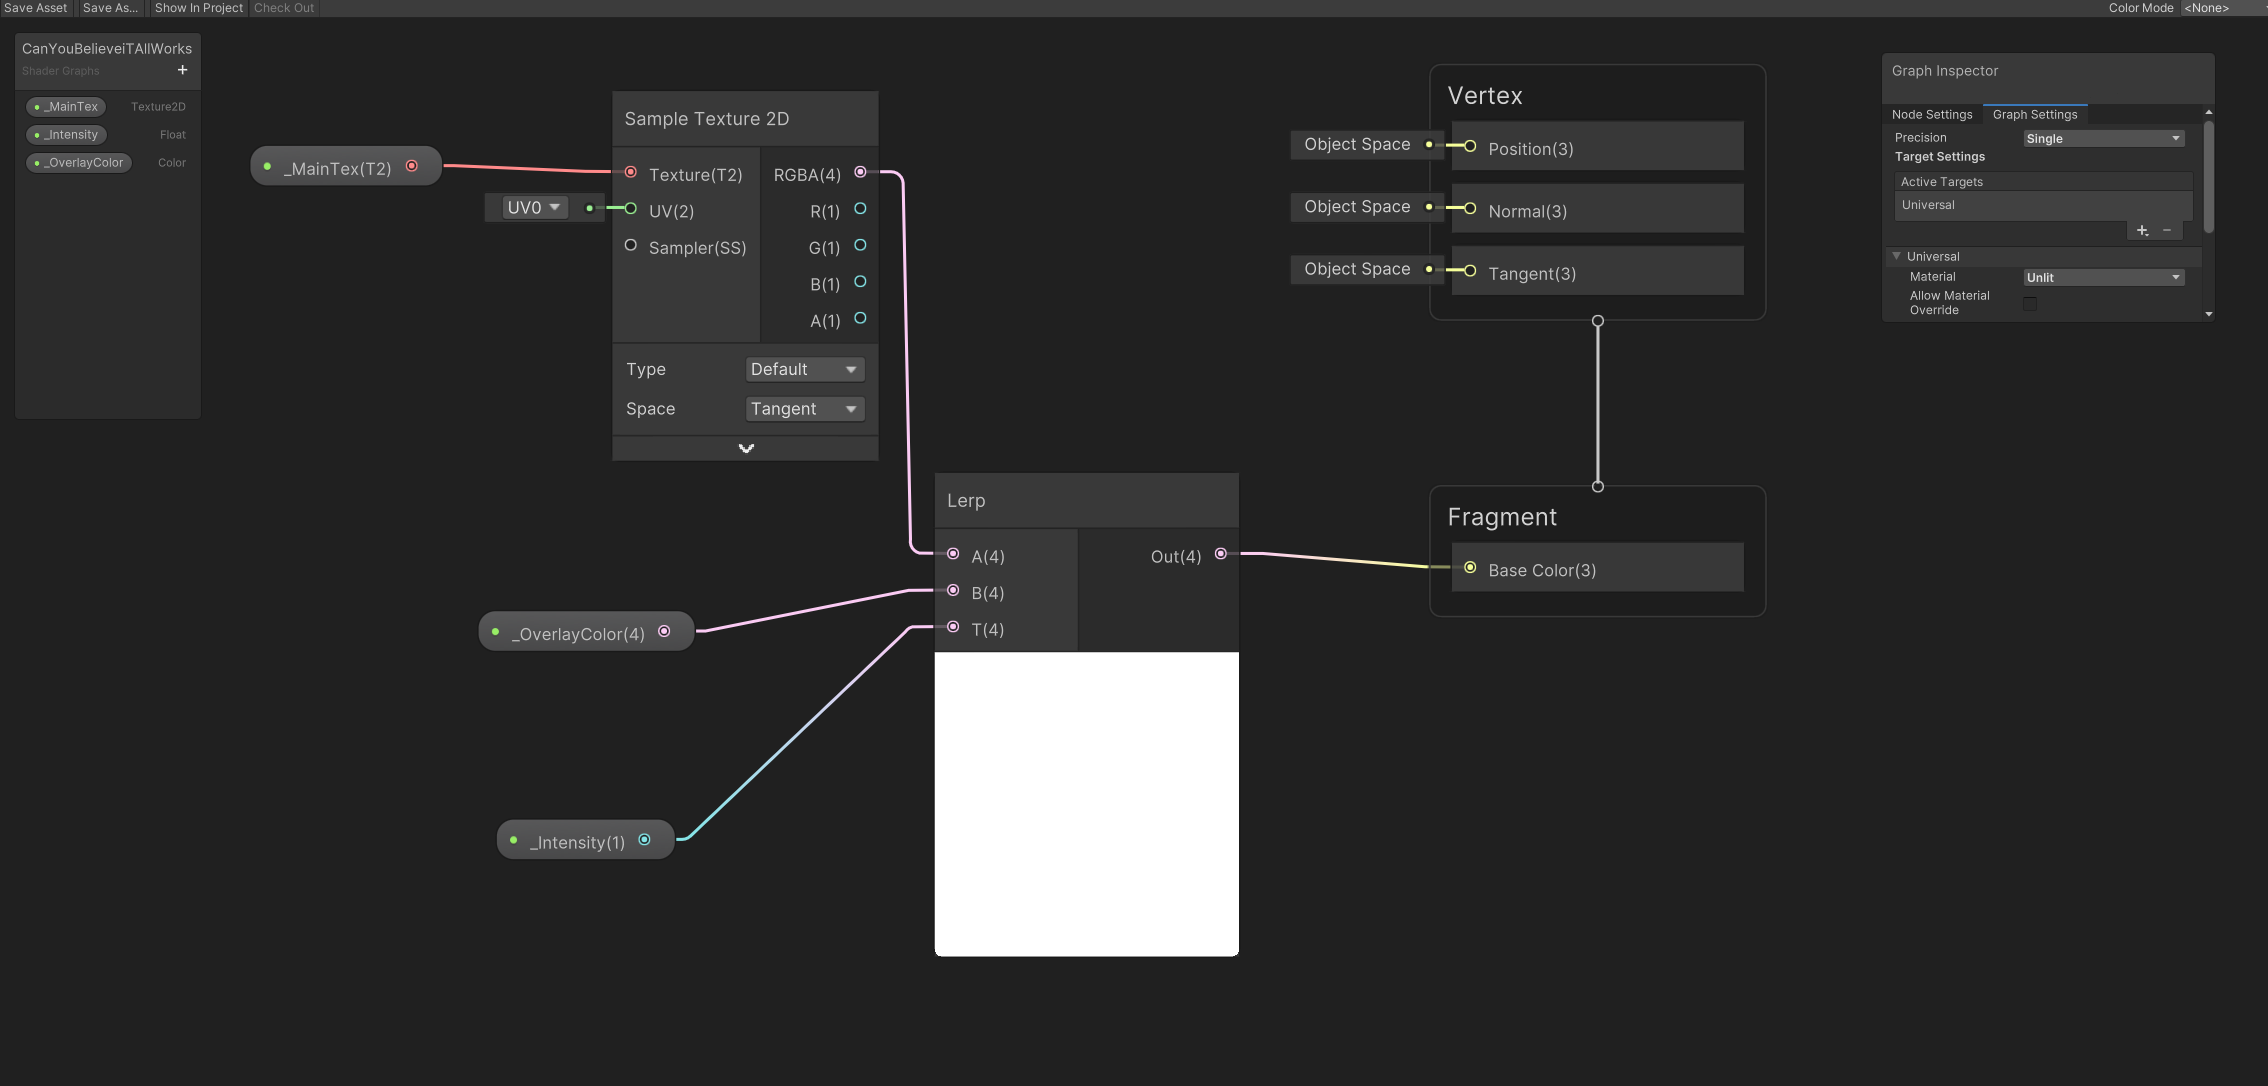
You can create it both in Shader Graph:
OR in HLSL if you prefer:
Shader "Hidden/Custom/CustomEffect"
{
	Properties
	{
	    _MainTex ("Main Texture", 2D) = "white" {}
	}
	SubShader
	{
		Tags { "RenderType"="Opaque" "RenderPipeline" = "UniversalPipeline" }

		Pass
		{
            HLSLPROGRAM
            #include "Packages/com.unity.render-pipelines.universal/ShaderLibrary/SurfaceInput.hlsl"

			#pragma vertex vert
			#pragma fragment frag

            TEXTURE2D(_MainTex);
            SAMPLER(sampler_MainTex);

			float _Intensity;
            float4 _OverlayColor;

            struct Attributes
            {
                float4 positionOS       : POSITION;
                float2 uv               : TEXCOORD0;
            };

            struct Varyings
            {
                float2 uv        : TEXCOORD0;
                float4 vertex : SV_POSITION;
                UNITY_VERTEX_OUTPUT_STEREO
            };


            Varyings vert(Attributes input)
            {
                Varyings output = (Varyings)0;
                UNITY_INITIALIZE_VERTEX_OUTPUT_STEREO(output);

                VertexPositionInputs vertexInput = GetVertexPositionInputs(input.positionOS.xyz);
                output.vertex = vertexInput.positionCS;
                output.uv = input.uv;

                return output;
            }

            float4 frag (Varyings input) : SV_Target
            {
                UNITY_SETUP_STEREO_EYE_INDEX_POST_VERTEX(input);

				float4 color = SAMPLE_TEXTURE2D(_MainTex, sampler_MainTex, input.uv);
				return lerp(color, _OverlayColor, _Intensity);

            }

			ENDHLSL
		}
	}
	FallBack "Diffuse"
}
Of course, just be sure to declare the “_MainTex” property (which is the screen color), and then all the Volume Component ones (“_Intensity” and “_OverlayColor”).
Custom Renderer Feature
Then, we can declare the renderer feature.
We only need the bare minimum to make it work, so simply create a script called “CustomPostProcessRenderer” and add:
using UnityEngine.Rendering.Universal;

[System.Serializable]
public class CustomPostProcessRenderer : ScriptableRendererFeature
{
    CustomPostProcessPass pass;

    public override void Create()
    {
        pass = new CustomPostProcessPass();
    }

    public override void AddRenderPasses(ScriptableRenderer renderer, ref RenderingData renderingData)
    {
        renderer.EnqueuePass(pass);
    }
}
It will throw some errors because we still need to create our custom pass (also don’t forget to reference the Unity URP assembly, in case you’re using them), so let’s do it right away.
Custom Pass
This is where the fun happens (effects get rendered).
I will explain things in the script’s comments, so create one called “CustomPostProcessPass”:
using UnityEngine;
using UnityEngine.Rendering;
using UnityEngine.Rendering.Universal;

[System.Serializable]
public class CustomPostProcessPass : ScriptableRenderPass
{
	// Used to render from camera to post processings
	// back and forth, until we render the final image to
	// the camera
    RenderTargetIdentifier source;
    RenderTargetIdentifier destinationA;
    RenderTargetIdentifier destinationB;
    RenderTargetIdentifier latestDest;

    readonly int temporaryRTIdA = Shader.PropertyToID("_TempRT");
    readonly int temporaryRTIdB = Shader.PropertyToID("_TempRTB");

    public CustomPostProcessPass()
    {
        // Set the render pass event
        renderPassEvent = RenderPassEvent.BeforeRenderingPostProcessing;
    }

    public override void OnCameraSetup(CommandBuffer cmd, ref RenderingData renderingData)
    {
        // Grab the camera target descriptor. We will use this when creating a temporary render texture.
        RenderTextureDescriptor descriptor = renderingData.cameraData.cameraTargetDescriptor;
        descriptor.depthBufferBits = 0;

        var renderer = renderingData.cameraData.renderer;
        source = renderer.cameraColorTarget;

        // Create a temporary render texture using the descriptor from above.
        cmd.GetTemporaryRT(temporaryRTIdA , descriptor, FilterMode.Bilinear);
        destinationA = new RenderTargetIdentifier(temporaryRTIdA);
        cmd.GetTemporaryRT(temporaryRTIdB , descriptor, FilterMode.Bilinear);
        destinationB = new RenderTargetIdentifier(temporaryRTIdB);
    }

    // The actual execution of the pass. This is where custom rendering occurs.
    public override void Execute(ScriptableRenderContext context, ref RenderingData renderingData)
    {
    	// Skipping post processing rendering inside the scene View
        if(renderingData.cameraData.isSceneViewCamera)
            return;

        // Here you get your materials from your custom class
        // (It's up to you! But here is how I did it)
        var materials = CustomPostProcessingMaterials.Instance;
        if (materials == null)
        {
            Debug.LogError("Custom Post Processing Materials instance is null");
            return;
        }

        CommandBuffer cmd = CommandBufferPool.Get("Custom Post Processing");
        cmd.Clear();

		// This holds all the current Volumes information
		// which we will need later
        var stack = VolumeManager.instance.stack;

        #region Local Methods

		// Swaps render destinations back and forth, so that
		// we can have multiple passes and similar with only a few textures
        void BlitTo(Material mat, int pass = 0)
        {
            var first = latestDest;
            var last = first == destinationA ? destinationB : destinationA;
            Blit(cmd, first, last, mat, pass);

            latestDest = last;
        }

        #endregion

		// Starts with the camera source
        latestDest = source;

        //---Custom effect here---
        var customEffect = stack.GetComponent<CustomEffectComponent>();
        // Only process if the effect is active
        if (customEffect.IsActive())
        {
            var material = materials.customEffect;
            // P.s. optimize by caching the property ID somewhere else
            material.SetFloat(Shader.PropertyToID("_Intensity"), customEffect.intensity.value);
            material.SetColor(Shader.PropertyToID("_OverlayColor"), customEffect.overlayColor.value);

            BlitTo(material);
        }

        // Add any other custom effect/component you want, in your preferred order
        // Custom effect 2, 3 , ...


		// DONE! Now that we have processed all our custom effects, applies the final result to camera
        Blit(cmd, latestDest, source);

        context.ExecuteCommandBuffer(cmd);
        CommandBufferPool.Release(cmd);
    }

	//Cleans the temporary RTs when we don't need them anymore
    public override void OnCameraCleanup(CommandBuffer cmd)
    {
        cmd.ReleaseTemporaryRT(temporaryRTIdA);
        cmd.ReleaseTemporaryRT(temporaryRTIdB);
    }
}
Extra: Materials
You might still have some errors if you didn’t set up the class that creates/gets the materials.
In case you need some hints on how to set up one, here is an example (which expects you to have this ScriptableObject named “CustomPostProcessingMaterials” in a Resources folder):
using UnityEngine;

[System.Serializable, CreateAssetMenu(fileName = "CustomPostProcessingMaterials", menuName = "Game/CustomPostProcessingMaterials")]
public class CustomPostProcessingMaterials : UnityEngine.ScriptableObject
{
    //---Your Materials---
    public Material customEffect;

    //---Accessing the data from the Pass---
    static CustomPostProcessingMaterials _instance;

    public static CustomPostProcessingMaterials Instance
    {
        get
        {
            if (_instance != null) return _instance;
            // TODO check if application is quitting
            // and avoid loading if that is the case

            _instance = UnityEngine.Resources.Load("CustomPostProcessingMaterials") as CustomPostProcessingMaterials;
            return _instance;
        }
    }
}
Otherwise you can create materials dynamically as Unity is doing in their PostProcessPass.
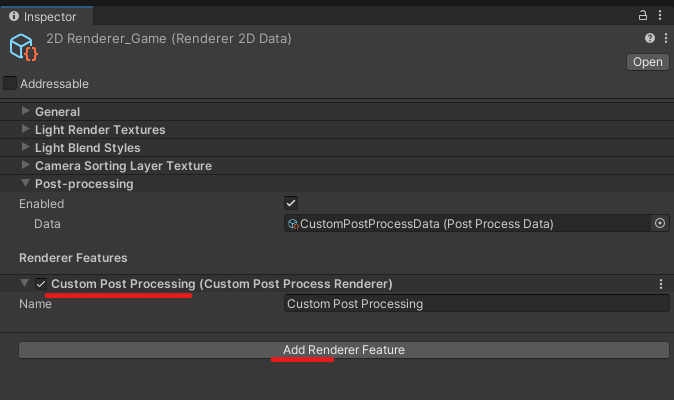
Add the renderer feature
As the last step, we simply need to tell Unity’s URP renderer to use our Custom Renderer Feature.
Head over your “Renderer” asset, which might be a forward renderer, a 2D renderer or similar, and add the “CustomPostProcessRenderer” feature:
Believe it or not… that’s it!
You can now use volumes to integrate your own custom post processing effects, and hopefully it will be easier to port into the official solution once it arrives.
Sources
- To create the Renderer Feature & Pass, I have used the templates by Alexander Ameye.
- I have discovered about Volumes in this forum post by Staggart Creations.
- Since I cannot show my game yet (ironic!), the scene you see in the preview is the free asset store package “Sunny Land”.
Hope this helps! Please let me know if it did (and show some results / share it around?), so that I get really happy and work on other posts too. Have fun with it - Cheers!