Shaders are used to create many effects, like “water”, “fire” and more.
In order to understand them and become a wizard/witch, we have to learn a bit about meshes first.
Meshes
A mesh is made (usually!) by triangles, which means that each triangle has 3 vertices.
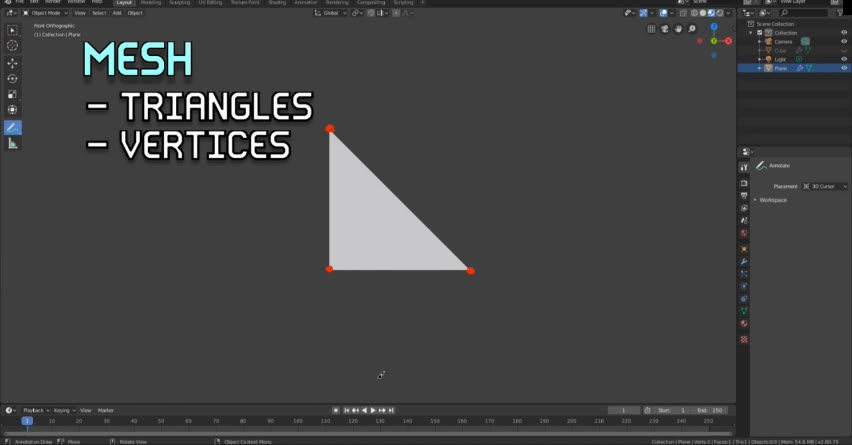
You can see the mesh as the structure of your object, built by combining its triangles together.
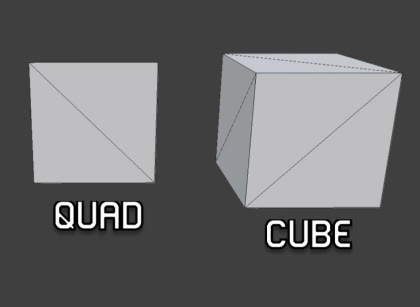
For example, it can represent a quad (which has two triangles), a cube, a sphere, a character etc.
Now, focusing on vertices, it’s important to know that each single vertex contains some data, more than its position.
In this tutorial, it’s necessary noting UVs.
UVs
UVs are also called texture coordinates and they let you map textures on your objects.
You’re basically saying to the computer: “hey, I want this texture drawn from here to here”. Think at vertices as your “waypoints”.
If you change the UVs (or texture coordinates) of one vertex, you’re also changing the way the texture is displayed on your mesh.
Shaders Theory
Now that we’ve scratched the topic of meshes, we can finally talk about shader.
Shaders are programs that describe the traits of vertices and pixels.
In other words, via shaders, you can set and change the way the computer renders the meshes.
They’re essential for your games, since you wouldn’t be able to see anything without them.
You can also create cool effects like distortions, portals, grass, water and anything a wizard can do, so: let’s see how they behave.
Their routine is usually this:
The mesh info (vertices, UVs etc.) is read from the computer and is passed to the Vertex Shader.
The Vertex Shader runs once per each vertex and sets your object’s position on Screen. It also prepares the data (like the UVs) that will be used next by the Pixel Shader.
The Pixel Shader runs once per each pixel and renders your object. Here you can apply textures (that’s why you need UVs), change colors, discard pixels etc.
The routine is now complete and it will be executed again in the next frame.
Shader Example
After this theory, it’s time for me to show you a practical example.
Here we have a really basic shader, let’s focus on this part for now, between the CGPROGRAM and ENDCG keywords.
Shader "FebucciTutorial/Simple Shader"
{
	SubShader
	{
	   Pass
	   {
		   CGPROGRAM
		   #pragma vertex vert
		   #pragma fragment frag

		   struct appdata
		   {
			   float4 vertex : POSITION;
		   };

		   struct FromVertToFrag
		   {
			   float4 vertex : SV_POSITION;
		   };

		   FromVertToFrag vert(appdata v)
		   {
			   FromVertToFrag o;
			   o.vertex = UnityObjectToClipPos(v.vertex);
			   return o;
		   }

		   float4 frag(FromVertToFrag i) : SV_Target
		   {
			   return float4(1, 0, 0, 1);
		   }

		   ENDCG
	   }
	}
}
The code you’re watching right now is exactly the routine we’ve discussed before.
With “#pragma vertex vert” we’re saying “Hey computer, I want the “vertex shader” to be executed on this method here, called vert”. (Be aware that in order for them to be paired, they must have the same name).We do the same with our “Pixel Shader”.
Disclaimer: there are two types of “Pixel Shaders”, one called “Fragment” and the other one called “Surface”. In this tutorial we’ll use a Fragment one, but don’t worry: I’ll talk about Surface Shaders and their differences in the next videos/articles.
As you can see from “ #pragma fragment frag” the formatting for the Pixel Shader is the same. “Hey computer, I want the “Fragment shader” to be executed on this method, called frag”.
By writing that, we have defined our vertex and pixel shaders and it’s time to begin our routine.
Placing Vertices
We first need the mesh info, this is why we have the parameter in the vertex method/shader.
FromVertToFrag vert(appdata v)
{
    FromVertToFrag o;
    o.vertex = UnityObjectToClipPos(v.vertex);
    return o;
}
Its type is a struct called “appdata” and we can declare which data we need from the mesh.
In this case, we’re telling Unity that we need the position of each vertex.
struct appdata
{
    float4 vertex : POSITION;
};
You can find the semantics for other data in the Unity documentation, linked at the end of this article.
Now that we have this info in the vertex shader, we can place each vertex on the screen, thanks to the function UnityObjectToClipPos(v.vertex) .
FromVertToFrag vert(appdata v)
{
    FromVertToFrag o;
    o.vertex = UnityObjectToClipPos(v.vertex);
    return o;
}
We are also preparing the info for the next step of our routine. The data is a struct called “FromVertToFrag” and again, we’re telling that this data contains each vertex position.
struct FromVertToFrag
{
    float4 vertex : SV_POSITION;
};
As we’ve seen in our Routine, the Pixel Shader needs this info and takes it from the vertex shader. That’s why we can see a “return” on it (and the same struct!).
Also, to easier understand, its type is literally called “From Vertex to Fragment”.
Rendering pixels
Summing up, we now have our vertices placed in the world, but we can’t see our object yet.
Here comes the pixel shader, that runs on all the pixels and renders the mesh.
In it, we’re returning each pixel’s color.
float4 frag(FromVertToFrag i) : SV_Target
{
    return float4(1, 0, 0, 1);
}
Be aware that a color is composed by four values, Red Green Blue and Alpha (RBGA).
This is why the mesh is red, we’re returning 1, 0 and 0. (and of course transparency is set to one)
If we want a white color, we can write all ones (since white contains all the color).
As an exercise, try turning the mesh blue, then black, and then try creating the colour yellow.
Now, believe it or not, you’ve just passed the highest obstacle.
If you get how this routine works, you’re already on a good point.
It’s finally time to introduce Properties.
Be aware that I’ll talk about the other things that I’ve left behind (like Passes, Sub Shaders, Tags etc.) in the next video/article, but for now to easier understand shaders in general, take them as they are. Also, the transparency of our objects in this video will always be One. We’ll understand why and we’ll play with it in the next episode.
PS. Oh hey almost three years ago I released a plugin called “Text Animator for Unity”, a tool I made/needed for my own games - and Today it is also getting used in other games like “Dredge, Cult of The Lamb”, “Slime Rancher 2” and many more!! I’d love if you could check it out! you’d also support me while I work on exciting stuff behind the scenes, so… thank you very much! ✨
Baaack to the article.
Properties
Properties are variables that show up in the inspector and you can use them in your shaders.
Float
For example, let’s add a variable (a number in this case) that will decide the amount of red in our color.
Start writing our variable inside the Properties block.
Begin with our variable name, then write the label shown in the inspector, its type, and at the end, decide its default value.
Shader "FebucciTutorial/Simple Shader Intensity"
{
	Properties
	{
		_RedAmount("Red Amount", Float) = 1
	}

	SubShader
	{
	   Pass
	   {
		   CGPROGRAM
		   #pragma vertex vert
		   #pragma fragment frag

		   struct appdata
		   {
			   float4 vertex : POSITION;
		   };

		   struct v2f
		   {
			   float4 vertex : SV_POSITION;
		   };

		   float _RedAmount;

		   v2f vert(appdata v)
		   {
			   v2f o;
			   o.vertex = UnityObjectToClipPos(v.vertex);
			   return o;
		   }

		   float4 frag(v2f i) : SV_Target
		   {
			   return float4(_RedAmount, 0, 0, 1);
		   }

		   ENDCG
	   }
	}
}
The semantics that you have to follow are available in the Unity Documentation, you can find its link at the end of this article.
Let’s check if everything works. Create a material, apply your shader on it and set it on the model. If done correctly, your model is not pink and you can see the “Intensity” popping up in the inspector.
Now, If you want to use this property, you have to write again its type and name inside the Pass (line 27).
Be aware that each variable declaration must be written BEFORE you actually use it. Also, the previously called “FromVertToFrag” is now abbreviated to “v2f”, which still means “vertex to fragment”.
We wanted to set the amount of red so, let’s complete the final step (line 38). As you can see, its amount changes based on the inspector.
Color
As another example, let’s add a color.
Again, variable name, label, type and default value (line 6).
Shader "FebucciTutorial/Simple Shader Color"
{
	Properties
	{
		_MainColor("Main Color", Color) = (1,1,1,1)
	}

	SubShader
	{
	   Pass
	   {
		   CGPROGRAM
		   #pragma vertex vert
		   #pragma fragment frag

		   struct appdata
		   {
			   float4 vertex : POSITION;
		   };

		   struct FragToVert
		   {
			   float4 vertex : SV_POSITION;
		   };

		   float4 _MainColor;

		   FragToVert vert(appdata v)
		   {
			   FragToVert o;
			   o.vertex = UnityObjectToClipPos(v.vertex);
			   return o;
		   }

		   float4 frag(FragToVert i) : SV_Target
		   {
			   return _MainColor;
		   }

		   ENDCG
	   }
	}
}
We check that it shows up in the inspector correctly and then, we can continue.
Now we have to write it again in our Pass (line 27).
Be aware that the type “Color” doesn’t exist in this shader language, but, since we know that it needs 4 values (RGBA), a float4 will do the trick.
Now we can return our property in the pixel shader (line 38).
Texture
For this last example, let’s render a texture.
As always, variable name, label, type and default value.
Then, we write it again in our Pass.
This time, the type used for textures is called “sampler2D”.
Shader "FebucciTutorial/Simple Shader With Tex"
{
	Properties
	{
		_MainTex("Texture", 2D) = "white" {}
	}

	SubShader
	 {
		Pass
		{
			CGPROGRAM
			#pragma vertex vert
			#pragma fragment frag

			#include "UnityCG.cginc" //to be explained in the future

			struct appdata
			{
				float4 vertex : POSITION;
				float2 uv : TEXCOORD0;
			};

			struct v2f
			{
				float4 vertex : SV_POSITION;
				float2 uv : TEXCOORD0;
			};

			sampler2D _MainTex;

			v2f vert(appdata v)
			{
				v2f o;
				o.vertex = UnityObjectToClipPos(v.vertex);
				o.uv = v.uv; //passes the uv from the mesh info (in the vertex shader) to the data that'll be given to the pixel shader
				return o;
			}

			fixed4 frag(v2f i) : SV_Target
			{
				return tex2D(_MainTex, i.uv); //returns the color, "sampled"/calculated from the texture
			}

			ENDCG
		}
	 }
}
Also, as we’ve seen in the first part of this video, textures need UVs.
The mesh info has to pass its texture coordinates to our vertex shader (float2 uv: TEXCOORD0), which passes it to the pixel shader (V2F).
struct appdata
{
    float4 vertex : POSITION;
    float2 uv : TEXCOORD0;
};

struct v2f
{
    float4 vertex : SV_POSITION;
    float2 uv : TEXCOORD0;
};

sampler2D _MainTex;

v2f vert(appdata v)
{
    v2f o;
    o.vertex = UnityObjectToClipPos(v.vertex);
    o.uv = v.uv; //passes the uv from the mesh info (in the vertex shader) to the data that'll be given to the pixel shader
    return o;
}
Now, we can get the color from our texture and return it (line 43).
Be sure to assign the texture in the inspector and then, if everything is set up correctly, we can see the texture on our model.
This first part has come to an end. I’ll cover the things that I’ve left behind in the next episode, and I’ll also talk about Shader Graph.
I wanted to make a much shorter article but it just wasn’t possible as a first introduction.
I do hope you’re now closer to turn into a wizard!