
A Vertex Shader lets you create different effects by moving your objects’ vertices in the scene, such as: waves, distortion around force fields (such as black holes), melting, flags movement, grass movement if the player steps on it and way more!
I’ll cover those effects (and others) one by one in future tutorials (stay tuned!); now it’s time to cover the basis.
PS. Oh hey almost three years ago I released a plugin called “Text Animator for Unity”, a tool I made/needed for my own games - and Today it is also getting used in other games like “Dredge, Cult of The Lamb”, “Slime Rancher 2” and many more!! I’d love if you could check it out! you’d also support me while I work on exciting stuff behind the scenes, so… thank you very much! ✨
Baaack to the article.
Shaders work all in a similar way and are made mostly by two sections, a “Vertex Shader” and a “Pixel Shader“.
Sections are mostly called Shaders too, which could be misleading and confusing…but that’s it.
The Vertex Shader/Program/Section comes first and calculates where your objects will be drawn. It places your objects in the world, calculating and operating each vertex individually.
The Pixel Shader operates on each pixel individually, for this reason it’s mostly used to apply textures and colors.
We’ve already seen a Pixel Shader in my previous posts, which is the “Surface Shader” (or a “Fragment Shader“).
Declaration
To tell our compiler that we have a Vertex Shader you must write #pragma vertex functionName between the CPROGRAM and ENDCG keywords. This way it will compile the method/function and know that we need a Vertex Shader.
After this, you have to declare a method, which is different depending if you want to use a Fragment Shader or a Surface Shader. In both cases, the Vertex Shader gets its information by the Mesh, then initialize each vertex and passes it to the Pixel Shader.
Documentation about: HLSL Snippets (#pragma).
Vertex and Fragment Shaders
//Implying that structs appdata and v2f are already defined by us
//Appdata is our "input", the vert function is the output
v2f vert (appdata v) //this is the vertex shader
{
    v2f o; //Initializes the information that will be passed to the fragment shader
    o.vertex = //[...] Sets the position of the vertex
    //Calculate things
    return o; //Returns the info
}

//"i" is the info about the Vertex, it's provided by the vert function
fixed4 frag (v2f i) : SV_Target //this is the fragment shader
{
    //Calculate color etc.
}
Documentation about: Vertex and Fragment Shaders examples, Shader Semantics.
Vertex and Surface Shaders
//Appdata_full is a built-in struct and is our input
//"o", which is of the "Input" type (declared by us prior to this method) contains the info for each vertex
void vert (inout appdata_full v, out Input o) { //Vertex Shader
    UNITY_INITIALIZE_OUTPUT(Input,o);
    //[...]
}

//"IN" is the input, it has all the info about our vertex and is calculated by the vert function
void surf(Input IN, inout SurfaceOutputStandard o) { //Pixel Shader
    //Calculate color etc.
}
Documentation about: Surface Shader examples (there are examples with vertex shaders in the middle of the article).
I’ll write the next part of the tutorial using a Surface Shader as Pixel Shader, for this reason my Vertex Shader will be of type “void” and so on, as you saw previously. Be aware that the process is the same in a Fragment Shader, you just need to change the declaration of the functions.
Basic Surface Shader
This is a basic Surface Shader, where I will modify the vert function.
Shader "Custom/VertexMovement" {
	Properties{
		_Color("Color", Color) = (1,1,1,1)
		_MainTex("Albedo (RGB)", 2D) = "white" {}
	}

	SubShader{
		Tags { "RenderType" = "Opaque" }

		CGPROGRAM
		//Notice the "vertex:vert" at the end of the next line
		#pragma surface surf Standard fullforwardshadows vertex:vert

		sampler2D _MainTex;

		struct Input {
			float2 uv_MainTex;
		};

		fixed4 _Color;


		void vert(inout appdata_full v, out Input o) {

			UNITY_INITIALIZE_OUTPUT(Input, o);
		}

		void surf(Input IN, inout SurfaceOutputStandard o) {

			fixed4 c = tex2D(_MainTex, IN.uv_MainTex) * _Color;
			o.Albedo = c.rgb;

			o.Alpha = c.a;
		}
		ENDCG
	}

FallBack "Diffuse"
}
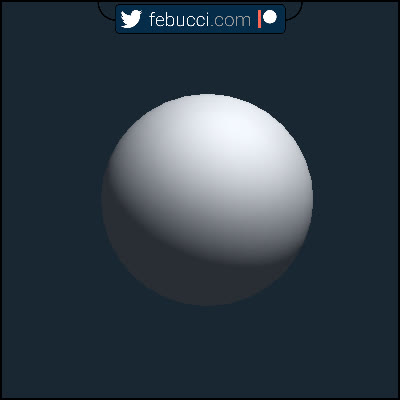
You can apply this material to a simple sphere (and also placing a directional light), having this as result:
Move Vertices Horizontally
Now that we know where we can move our vertices, it’s time to start experimenting.
We know our object position thanks to the parameter inout appdata_full v in the “vert” method.
In fact, according to Unity’s Documentation (link here), the appdata_full provides position, tangent, normal, color and four texture coordinates.
You can move your objects modifying the vertex variable. In this case we want to move our object horizontally, so we’ll only change the x component.
void vert(inout appdata_full v, out Input o) {

	//moves the object horizontally, in this case we add the sin of _Time
	v.vertex.x += sin(_Time * 30) * .3;

	UNITY_INITIALIZE_OUTPUT(Input, o);

}
Important Notes
Colliders and other components
As you can see, this Vertex Shader (and in generall, all of them) only changes where the vertices of your objects are placed/drawn. Their collider, shadow and so on won’t change, so please be aware of this when making your game.
Vertices Density
You also need to care about vertices density. More vertices you have and more times the Vertex Shader will run. Look at the next gif for an example:
P.S. More vertices means also less optimization… so: care!
That’s the line of code that moves the cubes: v.vertex.x += sin(_Time.x * 70 + v.vertex.y*2) * .7;
Vertices Input value
Vertices are passed into the shader and they’re transformed from object space into clip space, which is what determines where the vertices are on screen (they’re not screen coordinates by the way).
If you need the position of your vertices in worldSpace, you need to apply different transformations.
One example is the following: float3 worldPos = mul(unity_ObjectToWorld, v.vertex).xyz;.
Read more here: Built-in shader variables, Built-in shader helper functions, Surface Shaders (go to: Input structure).
Passing Information to the Pixel Shader
You can apply any math operation to your vertices and you can pass this information to your Pixel Shader. In my case I’m multiplying the vertices based on their Y component, creating a simple “waving” effect.
I’m telling then the Surface Shader how much I’ve multiplied each vertex, so it can fade color to white or blue accordingly.
To pass info between shaders (in this case between Vertex-Surface) you need to modify their input and output variables. The struct Input is what we’re looking for.
Shader "Custom/VertexMovement" {
	Properties{
		_Color("Color", Color) = (1,1,1,1)
		_MainTex("Albedo (RGB)", 2D) = "white" {}
	}

	SubShader{
		Tags { "RenderType" = "Opaque" }

		CGPROGRAM
		#pragma surface surf Standard fullforwardshadows vertex:vert

		sampler2D _MainTex;

		struct Input {
			float2 uv_MainTex;
			float multiplyValue; //The Surface function will need this
		};

		fixed4 _Color;


		void vert(inout appdata_full v, out Input o) {

			float multiplyValue = abs(sin(_Time * 30 + v.vertex.y)); //how much we want to multiply our vertex
			v.vertex.x *= multiplyValue * v.normal.x;
			v.vertex.z *= multiplyValue * v.normal.y;

			UNITY_INITIALIZE_OUTPUT(Input, o);
			o.multiplyValue = multiplyValue; //assing the multiply data to the "Input" value, so the surface shader can use it

		}

		void surf(Input IN, inout SurfaceOutputStandard o) {

			fixed4 c = tex2D(_MainTex, IN.uv_MainTex) * _Color;
			o.Albedo = lerp(c.rgb,
				float3(.3,.3,1),
				IN.multiplyValue);//the lerp factor is how much we've scaled our vertex
			o.Alpha = c.a;
		}
		ENDCG
	}

FallBack "Diffuse"
}
Extrude Mesh
What if you want to “expand/extrude” your object? You can’t add a fixed amount (for example v.vertex.x += 2), because this way you’ll translate all of the vertices to the right.
You actually need to add this value based on the direction of the vertex/face, which is called “normal”. appdata_full already contains a normal variable, so we can use this.
Shader "Custom/VertexMovement" {
	Properties{
		_Color("Color", Color) = (1,1,1,1)
		_MainTex("Albedo (RGB)", 2D) = "white" {}
		_Amount("Amount", Range(0,.3)) = .3
	}

	SubShader{
		Tags { "RenderType" = "Opaque" }

		CGPROGRAM
		#pragma surface surf Standard fullforwardshadows vertex:vert

		sampler2D _MainTex;

		struct Input {
			float2 uv_MainTex;
		};

		fixed4 _Color;
		fixed _Amount;

		void vert(inout appdata_full v, out Input o) {

			v.vertex.xyz += _Amount * v.normal.xyz;

			UNITY_INITIALIZE_OUTPUT(Input, o);

		}

		void surf(Input IN, inout SurfaceOutputStandard o) {

			fixed4 c = tex2D(_MainTex, IN.uv_MainTex) * _Color;
			o.Albedo = c.rgb;
			o.Alpha = c.a;
		}
		ENDCG
	}

FallBack "Diffuse"
}
Again, here’s Unity’s Documentation about: Providing vertex data to vertex programs.
Here’s another experiment I did, lerping the base model color with blue (and yellow comes along) depending on how much I’ve extruded the mesh.
Displacement Texture
With Shaders it’s super useful to use Textures to retrieve information.
To sample a Texture in a vertex program we must use the method tex2Dlod (documentation here). What we want to achieve is: expand our object based on the white value taken from our Displacement Texture.
That’s the result:
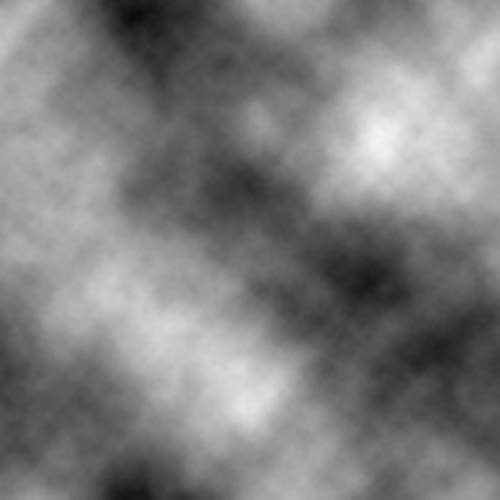
That’s the texture that I’ll use (I’ve already shared it in the dissolve tutorial and it’s a simple cloud texture):
In the Vertex Shader we can then calculate our “expand value” and then pass it to the Surface Shader, having this as result:
Shader "Custom/VertexMovement" {
	Properties{
		_Color("Color", Color) = (1,1,1,1)
		_MainTex("Albedo (RGB)", 2D) = "white" {}

		_Amount("Amount", Range(0,1)) = 0 //slider
		_DisplacementTexture("Displacement Texture", 2D) = "white"{} //displacement texture
	}

		SubShader{
			Tags { "RenderType" = "Opaque" }

			CGPROGRAM
			#pragma surface surf Standard fullforwardshadows vertex:vert

			sampler2D _MainTex;

			struct Input {
				float2 uv_MainTex;
				float displacementValue; //stores how much we've displaced the object
			};

			fixed4 _Color;
			float _Amount;
			sampler2D _DisplacementTexture;

			void vert(inout appdata_full v, out Input o) {

				//How much we expand, based on our DisplacementTexture
				float value = tex2Dlod(_DisplacementTexture, v.texcoord*7).x * _Amount;
				v.vertex.xyz += v.normal.xyz * value * .3; //Expand

				UNITY_INITIALIZE_OUTPUT(Input, o);
				o.displacementValue = value; //Pass this info to the surface shader
			}

			void surf(Input IN, inout SurfaceOutputStandard o) {

				fixed4 c = tex2D(_MainTex, IN.uv_MainTex) * _Color;

				o.Albedo = lerp(c.rgb * c.a, float3(0, 0, 0), IN.displacementValue); //lerp based on the displacement

				o.Alpha = c.a;
			}
			ENDCG
	}

		FallBack "Diffuse"
}
Shader Graph and Vertex Shaders
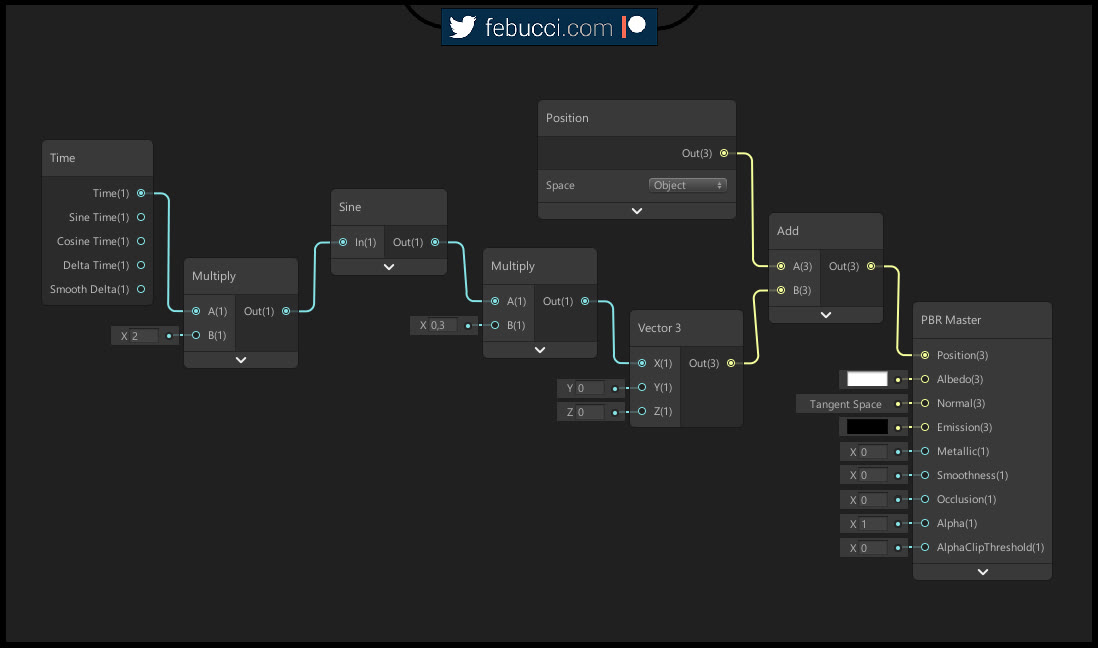
If you want to create a Vertex Shader using Shader Graph, it’s super simple!
The concepts here are the same, you only need to use the “Position Node” and connect it to the Master Node. Then you can calculate your position in both Clip (Object), World, Normal and View Space! Unity will do everything for you under the hood, as written previously.
That’s the first shader (object moved horizontally) written in this tutorial, converted in Shader Graph:
Documentation: Position Node.